Sitecore for Developers
Sitecore 9.0 Installation with SIF
This blog explains the steps and experiences and errors I encountered in the installation of Sitecore 9.0.Sitecore 9.0 installation differs from its previous installations and removes the dependency of the SIM installations as with the previous Sitecore installations.With sitecore 9.0 installations, we get enhanced advantages of some core functionalities like sitecore xConnect which allows two way data connect,data exchange framework 2.0 enhanced SQL providers,native integration with Azure services.Lets discuss the prerequisites and installation steps.Prerequisites
- Sitecore Installation Framework
- Powershell 5.0 or later
- Web Platform Installer
- Windows 10
- Microsoft SQL server server 2016
- Java Runtime environment
- Solr 6.6.1
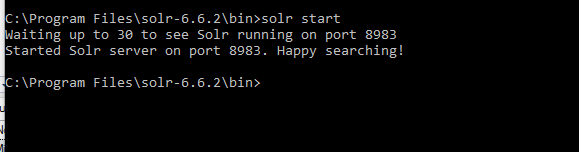
Initial StepsInstall Javaruntime for Windows by using http://www.oracle.com/technetwork/java/javase/downloads/jre8-downloads-2133155.htmlInstall Solr 6.6.2(solr-6.6.2.zip) from the following URLhttps://www.apache.org/dist/lucene/solr/6.6.2/Extract the zip file into program filesNavigate to the solr installation folder using command – cd C:\Program Files\solr-6.6.2\binRun command solr start.Solr will start on port 8983.Make sure url http://localhost:8983/solr/# running.
Add SSL to SolrWe need to generate the ssl key by using java keyttol.exe which is in location ‘C:\Program Files\solr-6.6.2\server\etc’For doing this,Follow procedure below
- From command prompt -navigate to solr folder with command “cd C:\Program Files\solr-6.6.2\server\etc”
- Run “C:\Program Files\Java\jdk1.8.0_144\bin\keytool.exe” -genkeypair -alias solr-ssl -keyalg RSA -keysize 2048 -keypass secret -storepass secret -validity 9999 -keystore solr-ssl.keystore.jks -ext SAN=DNS:localhost,IP:127.0.0.1 -dname “CN=localhost, OU=Organizational Unit, O=Organization, L=Location, ST=State, C=Country” Note – C:\Program Files\Java\jdk1.8.0_144\bin is java JRE installation folder.
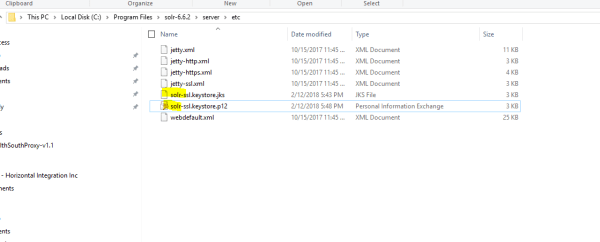
- solr-ssl.keystore.jks file will be ghenerated at C:\Program Files\solr-6.6.2\server\etc folder.
- Run “C:\Program Files\Java\jdk1.8.0_144\bin\keytool.exe” -importkeystore -srckeystore solr-ssl.keystore.jks -destkeystore solr-ssl.keystore.p12 -srcstoretype jks -deststoretype pkcs12 Note – enter ‘secret’ as password
- Key solr-ssl.keystore.p12 will be generated.See the screenshot
- Double click on the key to open certificate Import wizard and install certificate.
- While installing certificate , select Certificate Store: Trusted Root Certification Authorities
- Navigate to ‘C:\Program Files\solr-6.6.2\bin\solr.in.cmd’ and uncomment following lines(remove REM). set SOLR_SSL_KEY_STORE=etc/solr-ssl.keystore.jks set SOLR_SSL_KEY_STORE_PASSWORD=secret set SOLR_SSL_KEY_STORE_TYPE=JKS set SOLR_SSL_TRUST_STORE=etc/solr-ssl.keystore.jks set SOLR_SSL_TRUST_STORE_PASSWORD=secret set SOLR_SSL_TRUST_STORE_TYPE=JKS set SOLR_SSL_NEED_CLIENT_AUTH=false set SOLR_SSL_WANT_CLIENT_AUTH=false
- Restart solr usingsolr restart -p 8983 from C:\Program Files\solr-6.6.2\bin path
- Make sure url https://localhost:8983/solr/#is accessable and running.
Follow steps below to make Solr as service follow the steps below
- Install NSSM from https://nssm.cc/download
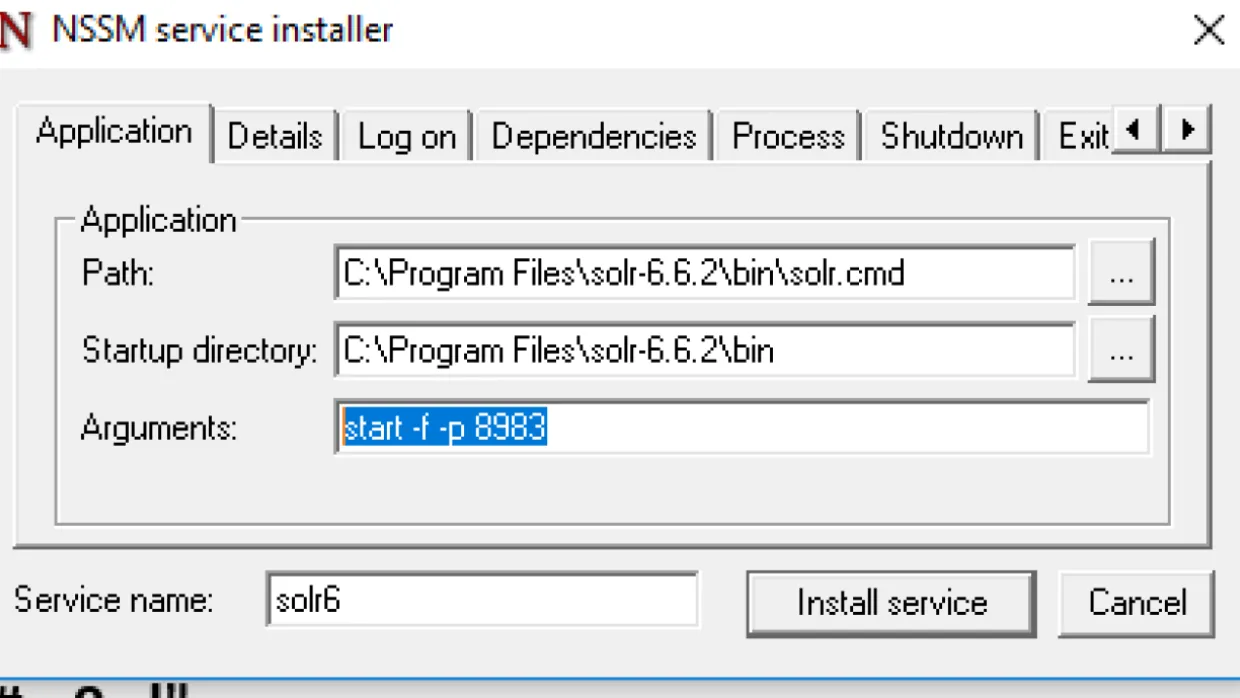
- Navigate to NSSM installed folder(for example C:\Program Files\nssm\nssm-2.24\nssm-2.24\win64) using command prompt and run nssm install solr6
- Populate the fields shown on service editor like shown in screenshot below.Make sure to add arguments ‘start -f -p 8983’ and install service.
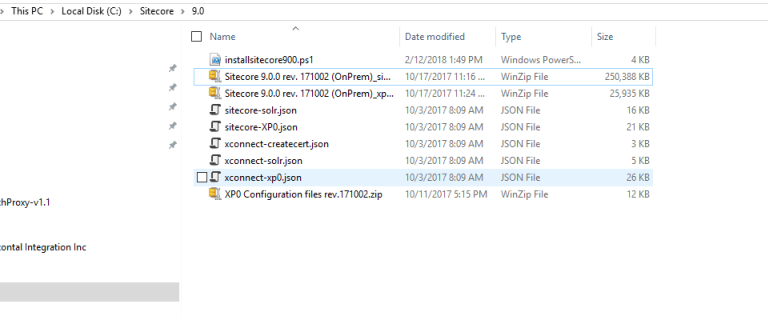
Next StepsCreate a folder with Name “Sitecore” under C drive or any base driveCreate folder with Name “9.0” under Sitecore and place Licence file in that folder.Download the Packages for XP Single from https://dev.sitecore.net/Downloads/Sitecore_Experience_Platform/90/Sitecore_Experience_Platform_90_Initial_Release.aspx and extract it to C:\Sitecore\9.0Navigate to http://dl.sitecore.net/updater/info/static/install/sitecore900.txt and copy the powershell script and paste it in “C:\Sitecore\9.0\installsitecore900.ps1” installsitecore900 is new powershell documents file to be created in that location.The directory should look like the screenshot below
Now, Open powershell command from C:\Sitecore\9.0 and run the below scriptRegister-PSRepository -Name SitecoreGallery -SourceLocation https://sitecore.myget.org/F/sc-powershell/api/v2Run the commandInstall-Module SitecoreInstallFrameworkNow, Run following commandInstall-Module SitecoreFundamentalsWe may want to Edit installsitecore900.ps1 and change following paths to reflect local paths$SolrUrl = “https://localhost:8983/solr”$SolrRoot = “C:\solr-6.6.2?(I changed this to C:\Program Files\solr-6.6.2)$SolrService = “solr”$SqlServer = “localhost”$SqlAdminUser = “sa”$SqlAdminPassword = “12345”$SqlAccountUser = “$prefix”$SqlAccountPassword = “Pa##w0rd”$FilesRoot = “C:\Sitecore”(I changed this to C:\Sitecore\9.0) Now, Run installsitecore900.ps1 script from folder c:\Sitecore\9.0Possible Errors
- Failed to start service ‘solr (solr)’.
Detailed stack error will be logged to file name ‘xconnect-solr.180212.log’Message says – The running command stopped because the preference variable “ErrorActionPreference” or common parameter is set to StopSolution – Make sure SSL is set up on Solr using above steps.
- The running command stopped because the preference variable “ErrorActionPreference” or common parameter is set to Stop: Failed to start service ‘solr (solr)’.”
Solution – Solr should be set up with SSL certificate.Make sure you restart the solr after installing SSL on Solr.If that does not work,make sure ‘JAVA_HOME’ environmental variable is there.If adding new system variable, a system restart will be needed.
- Unable to connect to master or target server ‘sc900_Processing.Pools’. You must have a user with the same password in master or target server ‘sc900_Processing.Pools’.
Solution – Open installsitecore900.ps1 with Notepad and edit to make sure $SqlServer = “ SQL server instance name if server name is not localhost” and update sa password with “12345” as it is specified in the “installsitecore900.ps1” file.More details can be found in https://www.sitecorespark.com/blog/2017/11/sitecore-installation-framework-error-processing-pools References https://dev.sitecore.net/Downloads/Sitecore_Experience_Platform/90/Sitecore_Experience_Platform_90_Initial_Release.aspxhttps://blogs.perficient.com/sitecore/2017/10/26/setup-and-basic-preparation-for-sitecore-9-installation/https://theagilecoder.wordpress.com/2017/07/24/sitecore-solr-ssl/https://www.sitecorespark.com/blog/2017/11/sitecore-installation-framework-error-processing-pools