Drupal
Migrate Sandbox or How to Fail Fast in Drupal Migrations
If you’ve ever used Drupal’s Migrate API, you know that failure is frequent. What’s more, debugging migrations is notoriously slow, requiring frequent rollbacks, resets, cache clears, and config imports. In this post I will highlight a tool that can help you get around all of these bottlenecks and fail faster: Migrate Sandbox.
Setup
If you want to follow along, you should spin up a new D10 site using a standard install with the following contrib projects included via composer:
Enable migrate_example (which is part of migrate_plus), migrate_sandbox, and yaml_editor. This will automatically enable a few other migration modules as well (including migrate and migrate_plus). You should log in as an admin and navigate to the Migrate Sandbox UI (Admin > Configuration > Development > Migrate Sandbox).
What Happens in the Sandbox Stays in the Sandbox
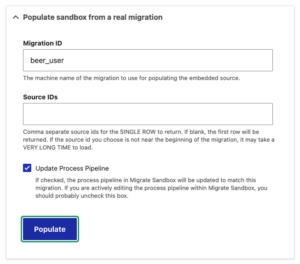
Populate the Sandbox
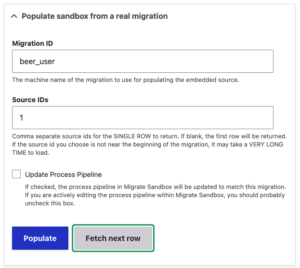
Migrate Sandbox offers a friendly UI where you can debug and prototype migrations. In this post, we will use Migrate Sandbox as a tool to work with the beer_user migration provided by migrate_example. Once in the sandbox, we can populate the source and process pipeline from that migration. We just open the “Populate from a real migration” drawer, enter beer_user, and click “Populate”.
Now we see what the first row of data looks like, and we also see that the process pipeline has been populated.
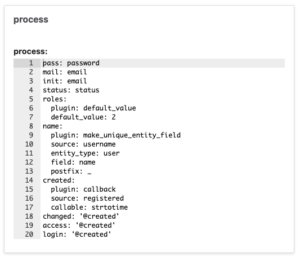
That process pipeline is an editable form. This post focuses on how we can edit that process pipeline directly within the Migrate Sandbox UI in order to save time.
Sandbox Escape Warnings
Now that the sandbox is populated, we can process the row to see the results. But first, if you scroll toward the bottom of the sandbox you'll note that we have a sandbox escape warning.
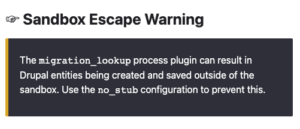
One of the goals of Migrate Sandbox is to produce no side-effects outside of the sandbox. If your migration includes a process plugin that is known to potentially cause side-effects, a sandbox escape warning appears. In this case we can simply scroll to the process section within Migrate Sandbox and edit the process pipeline at line 32.
field_migrate_example_favbeers:
  plugin: migration_lookup
  source: beers
  migration: beer_node
  no_stub: true
Now when we process the row by clicking the "Process Row" button near the bottom of the UI, there will be absolutely no effect outside the sandbox. That’s awesome because it means we won’t have to do any rollbacks as we’re playing in the sandbox.
Process the Sandbox Pipeline
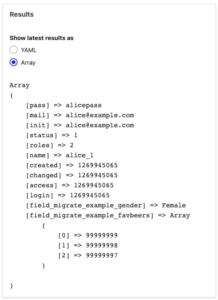
After clicking “Process Row” we can view the results near the bottom of Migrate Sandbox, output either as YAML or an array.
Where the Sandbox Shines
What About Migrate Devel?
Everything up to this point can be done in the terminal with Drush along with the indispensable Migrate Devel module. Sometimes that's all you need when debugging a migration, and I use it frequently. But maybe the simple fact that Migrate Sandbox is in the browser rather than the terminal is appealing. Or maybe you, like me, find it easier to trigger Xdebug breakpoints when working in the browser. Regardless, we’re going to see that Migrate Sandbox has some features that set it apart.
Validation of Content Entities
We start to see the power of Migrate Sandbox when we change the destination to migrate into a temporary content entity. In this case we’re migrating into a user.
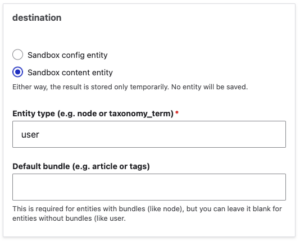
This entity won’t be saved; it just exists temporarily for the purposes of validation. If we process the row by clicking "Process Row", we notice an error message in the Migrate Sandbox UI:
(Migrate Message) [user]: roles.0.target_id=The referenced entity (user_role: 2) does not exist.
It turns out the process pipeline is a little broken! We need to change how roles get set. Let’s edit the process pipeline at line 7 within Migrate Sandbox to use authenticated as the default_value.
roles:
  plugin: default_value
  default_value: authenticated
Now when we process the row by clicking "Process Row", our validation error is gone. Neat!
In-Your-Face Error Messages
Now let’s really start failing. I don’t like how created is being set using the callback process plugin. It seems a little fragile.
created:
  plugin: callback
  callable: strtotime
  source: registered
I want to update that part of the process pipeline to use the core format_date process plugin. (This is one of my favorite process plugins to mess up with!) First, we need to know the format the source date is in. The first source row has the value 2010-03-30 10:31:05. That’s not totally conclusive. Let’s scroll up to the “Populate from a real migration” drawer and fetch the next row. Be sure to uncheck the “Update Process Pipeline” box since we’ve been editing the pipeline within the sandbox.
We see that the second row of data has the time 2010-04-04 10:31:05. Between those two dates we can be fairly confident that the source format is Y-m-d H:i:s. Let’s go for it!
created:
  plugin: date_format
    from_format: Y-m-d H:i:s
    source: registered
We process the row… and I made a booboo.
(Yaml Validation) process: A colon cannot be used in an unquoted mapping value at line 17 (near " source: registered").
Ah, I should not have put that extra indentation on lines 16 and 17. (It felt correct in the moment!) Writing migrations is just about the only time I find myself writing yaml by hand. Migrate Sandbox saves me a lot of time by calling out my invalid yaml. That’s an easy fix.
created:
  plugin: date_format
  from_format: Y-m-d H:i:s
  source: registered
We process the row… another problem.
(Uncaught Throwable) Drupal\Component\Plugin\Exception\PluginNotFoundException: The "date_format" plugin does not exist. Valid plugin IDs for Drupal\migrate\Plugin\MigratePluginManager are: block_plugin_id,…
You better believe I make a lot of typos like this. Typically, we’d have to reset the status of the migration after triggering an exception like this. In the sandbox, however, we can forego that step. We can quickly edit date_format to read format_date within the sandbox pipeline.
created:
  plugin: format_date
  from_format: Y-m-d H:i:s
  source: registered
We process the row… Oops! I made yet another mistake.
(Migrate Message) migrate_sandbox:created:format_date: Format date plugin is missing to_format configuration.
I guess I figured Drupal would handle that by magic. This kind of error would normally be buried in a migrate message table, but Migrate Sandbox shows it to us front-and-center. Most dates in Drupal are in the format of Y-m-d\TH:i:s, so let’s try that.
created:
  plugin: format_date
  from_format: Y-m-d H:i:s
  to_format: Y-m-d\TH:i:s
  source: registered
We process the row… and we’re not quite there.
(Migrate Message) [user]: created.0.value=This value should be of the correct primitive type.
That’s a validation error, which is something Migrate Sandbox exposes to us very clearly. I forgot that created is a timestamp. We can change to_format to U easily enough.
created:
  plugin: format_date
  from_format: Y-m-d H:i:s
  to_format: U
  source: registered
We process the row… and it finally processes! We see in the results that created has the expected value of 1269945065. Success!
Don't Forget to Save
Be aware that the updates you make within Migrate Sandbox don't get saved anywhere. At this point, we could copy/paste the modified part of the pipeline from the sandbox into the appropriate yaml file and be on our way.
Recap
Let's recap how Migrate Sandbox helped us fail fast:
- We saw all error messages directly on the page instead of having to search through migrate_message tables or db logs.
- We never had to reset the status of a migration before we could run it again.
- We never had to sync configuration or clear cache.
- We never had to roll back a migration.
And if you think this example was contrived and that nobody really makes this many errors in a migration, then you’ve never done a migration! You’re going to fail, so you might as well fail fast.