Marketing Automation
Event-driven marketing automation using Slack and MuleSoft
Before jumping into this blog, we need to understand what event-driven automation is.
Let’s start with basics:
Event-driven automation (EDA) is a powerful concept where actions are triggered by specific events. Imagine a world where things happen precisely when they should, not a moment sooner or later. That's the magic of event-driven automation.
To understand EDA, let’s focus on its major components:
- Events
- Event handler
- Workflows
Events
Events are like signals indicating that something noteworthy has occurred—be it a customer making a purchase, a user signing up, or even a temperature sensor detecting a sudden rise. Each event is a piece of information that could prompt action.
Event handler
The Event handler is the brain behind the operation. When an event occurs, the event handler decides what should happen next. It's the one calling the shots, determining the actions or processes to be executed in response to that event.
For example, consider a smart home system – when a motion sensor detects movement (event), the event handler could trigger actions like turning on lights or sending a notification to the homeowner.
Workflows
Workflows define the step-by-step sequences of actions that need to be performed when a particular event takes place. These actions could involve interacting with different systems, sending notifications, or updating data.
Use Case: Automating Salesforce Marketing Cloud activities
How can we automate the Salesforce Marketing Cloud activities?
We have a lot of ways to do that right. We can do that in SFMC itself or we can use any 3rd party tool. But how can we do that using event driven automation? Even if we can automate it, how can we pass our data seamlessly to the source -- Marketing Cloud.
To answer all the above questions, let’s go through a use case where we will trigger a Marketing Cloud journey using Slack commands.
We are going to integrate SFMC, Slack, and Salesforce CRM using MuleSoft.
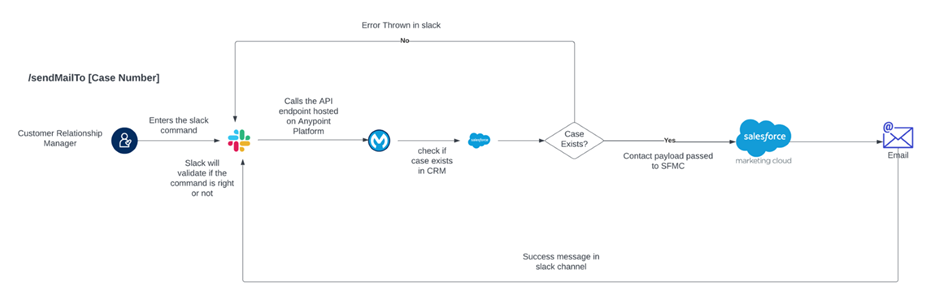
Below, the basic flow demonstrates what we are building using this use case.
Strategy:
Make use of existing connector present in the MuleSoft Anypoint Exchange.
-
Salesforce Connector – To fetch data from Salesforce in bulk or individually.
-
Salesforce Marketing Cloud Connector – To facilitate SFMC operations, though in this use-case we’re going to use HTTP request connector as ASYNC Event for Journey doesn’t have a connector.
Making these APIs reusable for future implementation.
Establishing Slack slash command
To create a functional slash command, you first need to subscribe to the Slack event which sends a POST request to your hosted application and requires certain parameters in response.
STEPS:
-
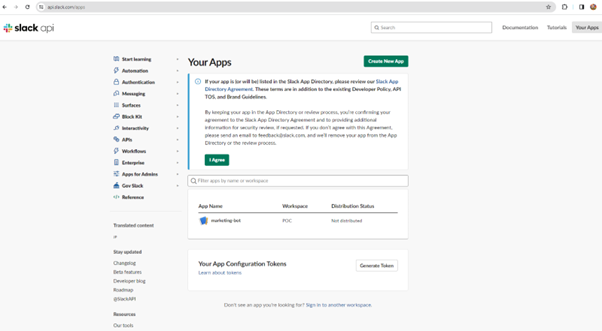
Create a SLACK APP by going to https://api.slack.com/apps
-
Click on Create New App and specify the workspace for which you want to create the app
-
Open the Slack App
-
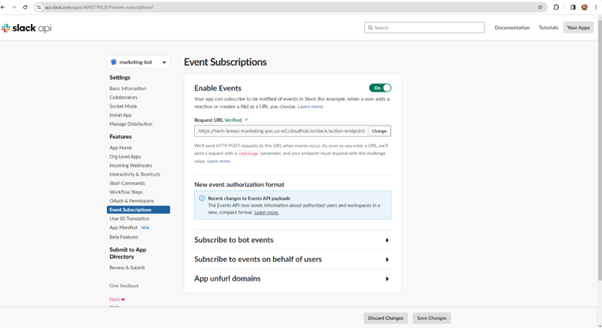
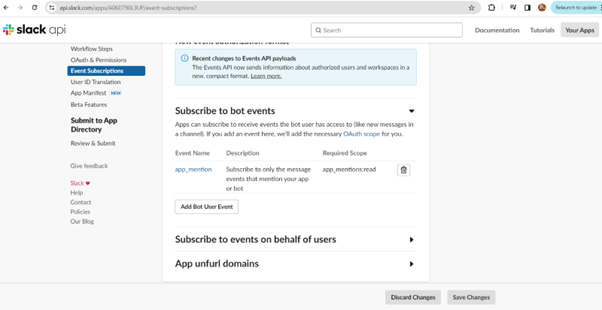
Click on Event Subscriptions on the left panel
-
Create and deploy your application on any platform (for this use case I have used Cloud Hub) which works and returns response as per https://api.slack.com/events/url_verification documentation.
-
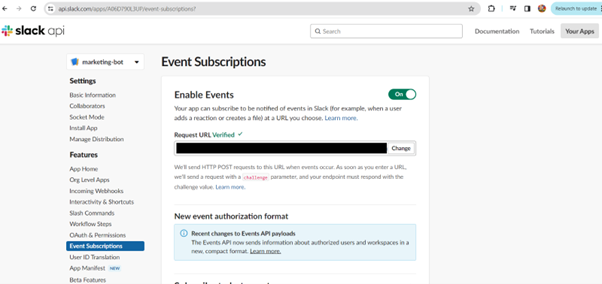
Once it’s verified, you’ll be able to see something like this.
-
Scroll Down on the same page.
-
Go to Subscribe to bot events and add an event “app_mention”
-
Navigate to Slash Commands on the left-panel
-
Click on the Create New Command button.
-
Enter the following details:
-
Command: this will serve as the slack command you’ll be entering in slack channels or application.
-
Request URL: this will serve as the end point where slack command will send the request. Make sure that it is same as the URL you used for Event Subscription. E.g. -> If Event Subscription URL is https://xyz.com/slackendPoint, then your command URL should look like https://xyz.com/slackendPoint/commandName.
-
Short Description: a short brief about your command
-
Usage Hint: this will serve as optional parameters that you can pass with the command.
-
-
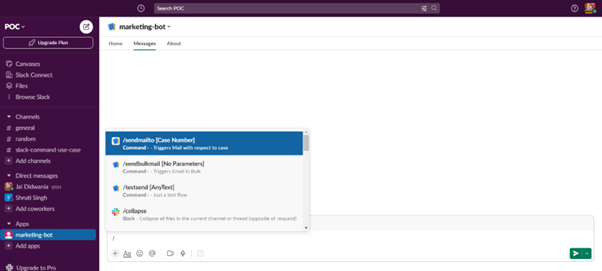
Navigate to the application that you created in SLACK. It will look like this.
-
With this we have setup the SLACK COMMAND. Now focus on the EVENT HANDLER, which will handle the slack command, process it, perform the action and respond back.
Establishing a connection with Salesforce
-
Add Salesforce connector from exchange using (X) Search in Exchange.
-
Drag and drop the required operation in the mule canvas.
-
Add a connector configuration for the added operation by clicking on (+) in the operation properties.
-
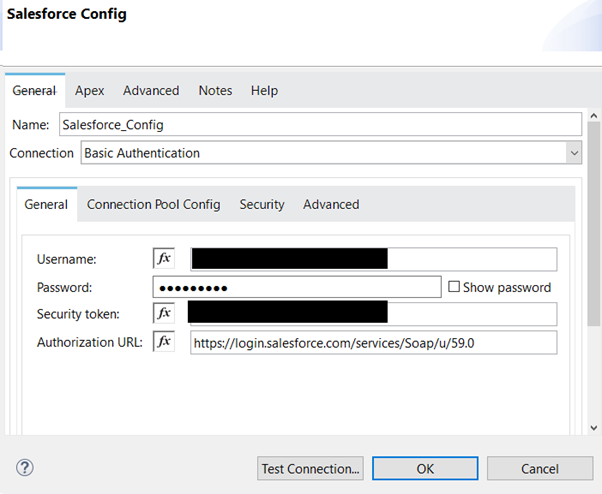
In the connector config, select the connection strategy.
-
Add the required details as per your connection strategy.
-
Click on Test Connection to confirm that MuleSoft can connect with the specified server.

-
Click OK.
Establishing a connection with Salesforce Marketing Cloud
In this use case, I have used ASYNC Add Contacts API from the API collection provided by Salesforce Marketing Cloud. For this API, we do not have a MuleSoft connector hence we’re going to establish connection and enter the contacts in the SFMC Journey by using a HTTP request connector provided by MULESOFT.
To establish a connection in MuleSoft follow the below steps:
-
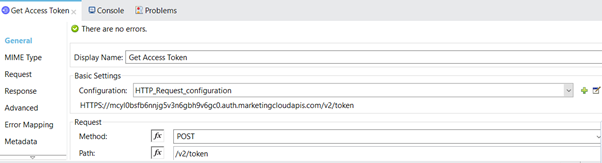
First, we need to get an access token to send request to SFMC.
-
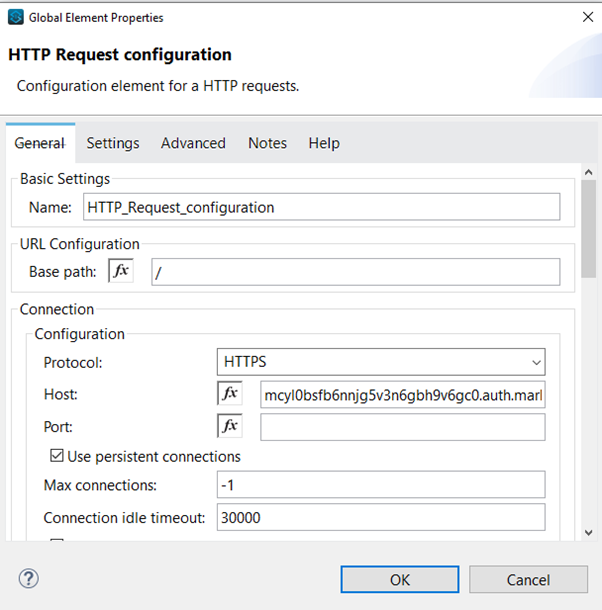
Enter the Host, Keystore, Basic Authentication details in the HTTP Request Configuration.
-
Click on OK after entering all the details.
-
Enter the Method as POST.
-
Enter the Path as /v2/token.
-
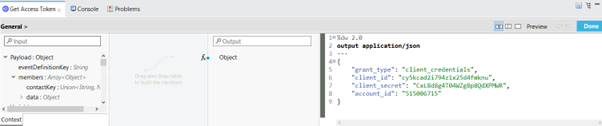
To get the token, send grant_type, client_id, client_secret and SFMC account_id in the request body.
-
Make sure you are storing the access token in a separate variable.

-
Drag another HTTP Request connector after the token connector, which will send the contacts into the SFMC journey.
-
Follow the same steps from 2-4 as mentioned above.
-
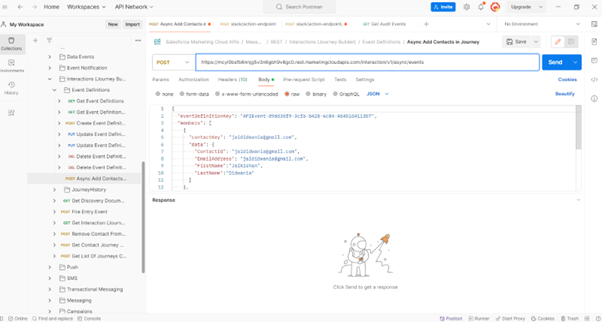
Enter the Path as /interaction/v1/async/events.
-
In body make sure we are passing the entire payload which is nothing but the contact details or the body of the requested API call.
-
NOTE: We’ll cover in the next section how we’re forming the body of this HTTP request.
MULE FLOW: Event Subscription Flow
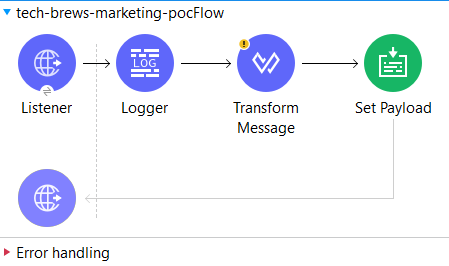
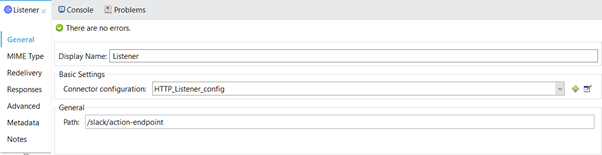
Step 1: Configure a HTTP listener to catch the request sent by SLACK event subscription for verification.
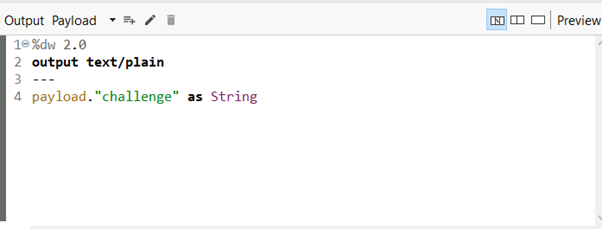
Step 2: Transform the payload sent by SLACK and fetch the value for challenge key.
Step 3: Set the payload.
/sendBulkMail Flow
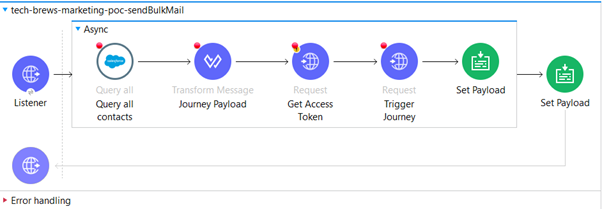
Step 1: Configure an HTTP listener which will listen to the request we set up in the SLACK /sendBulkMail Command. Make sure the end point is correct.

Step 2: As Slack Command needs a response in 3 seconds right after triggering a Command, we’re going to use an ASYNC component in MuleSoft which will do the entire processing and error handling, & for Slack command response we will send a payload in response.
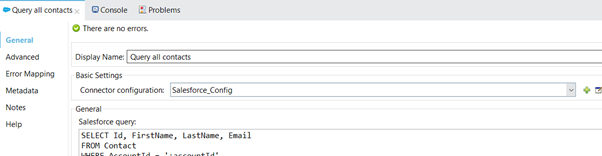
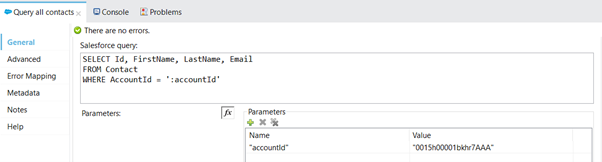
Step 3: Query all the contacts related to the Salesforce Account.
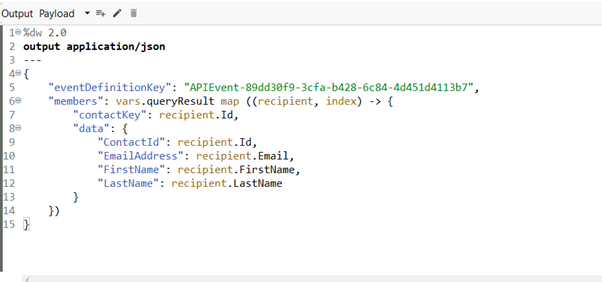
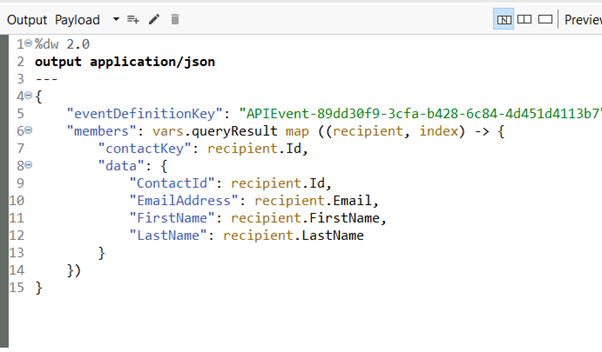
Step 4: Transform and create a Payload to send in the SFMC API which will enter the contacts in the JOURNEY.
NOTE: The eventDefinitionKey is the key that is related to the JOURNEY.
Step 5: Get the access token, use the steps mentioned above in the SFMC Configuration.
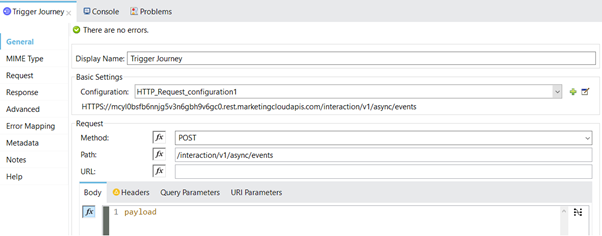
Step 6: Trigger the Journey using HTTP request configuration and use the payload we created in the earlier step.
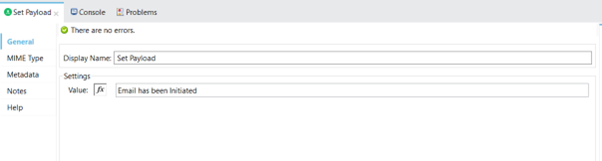
Step 7: Set the Payload for the SLACK command to inform user that Journey has been initiated.

/sendMailTo Flow
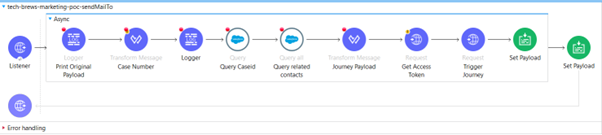
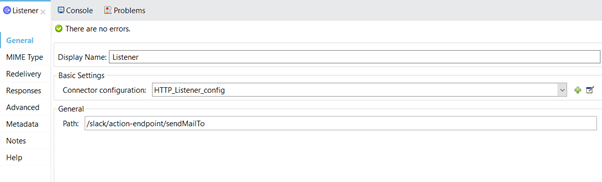
Step 1: Configure an HTTP listener which will listen to the request we set up in the SLACK /sendMailTo Command. Make sure the end point is correct.
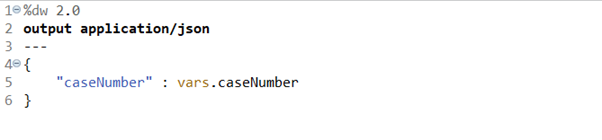
Step 2: While sending the command from Slack,we will send an extra parameter with the command. For example: /sendMailTo 12345 which will serve as a Case Number in this use case.
To fetch this case number, we can simply use the payload sent by Slack, and extract it.

Step 3: Query the Case Id and related contact Id from case object.
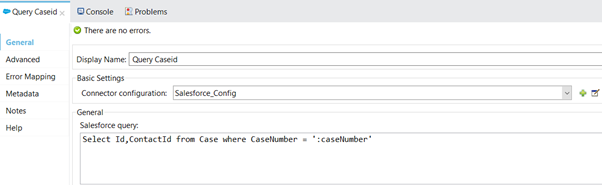
Make sure to pass the Case Number as parameters.
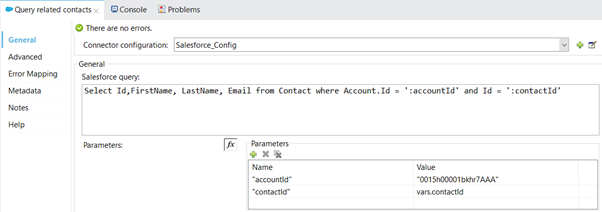
Step 4: Query the related contact using contact Id we fetched earlier.
Step 5: Create the payload which will be used to trigger the SFMC Journey.
Step 6: Get the access token, repeat the steps as provided above in SFMC config section.
Step 7: Trigger the journey using the HTTP request connector and pass the entire payload that we prepared in the body.
Step 8: Set the Payload for the SLACK command to inform user that Journey has been initiated.
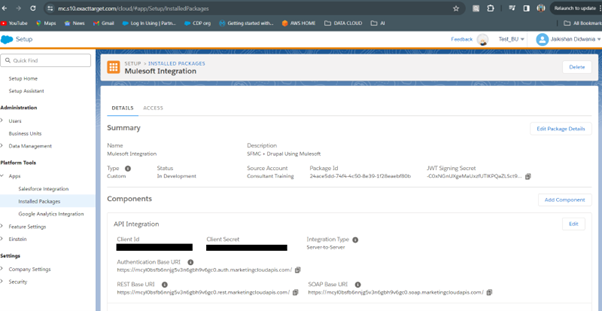
NOTE: The SFMC host URL will be different for your Marketing Cloud instance.
To do that create a package in SFMC which will provide all the information required for the connection.